-
03-17-2025, 09:07 PM
#121
Is that a 3" center to center spacing for the header bolts?
What is the mega fuse for by the oil filter location? I noticed the one for the alternator output on the passenger side.
Jen
MK4 complete kit, IRS, Ford Strokers 347 (carb & mechanical fuel pump), TKX, PS, heater-defroster-wipers, firewall forward, 11.65 rear brakes, 17" Halibrands, #11124.
Ordered: 9.8.2024
Delivered: 10.31.2024
-
03-17-2025, 09:42 PM
#122

Originally Posted by
Jeff Kleiner

Too bad that you already shipped them. I was going to recommend that with them (semi) mounted you need to make sure that you can get a socket on the plugs and if not have him address that as well. Just sayin' based on some things I've seen

Jeff
Thanks Jeff. I just got a note from Georgie and he'll be working on them over the next couple of days. I can send him a note to take a look as I would assume that he'll test fit these before sending them back out? Thanks for the heads up!
-
03-17-2025, 09:44 PM
#123
Originally Posted by
jengum
Is that a 3" center to center spacing for the header bolts?
What is the mega fuse for by the oil filter location? I noticed the one for the alternator output on the passenger side.
3" would be correct. The other fuse is from the BT amplifier as I ran it straight to the battery.
-
03-17-2025, 10:20 PM
#124

Tilton Clutch MC
Thanks to Mike Bray, I did make the decision to change out my Wilwood clutch master with the Tilton version (75-812U). This is the 13/16" bore size, which is the same size that Forte sends out with this hydraulic clutch kit. Although I never had any issues with the Wilwood MCs in my last build (almost 7K miles worth), I thought I'd take a look and see what all of the hubub was about.
First off, Tilton does make a nice unit. Although it still fits into the same housing as the Wilwood, it's a larger unit and feels more robust. I did not take it apart, but from some of the posts about it, the bore on the Tilton is hard anodized and won't wear if the MC is not perfectly aligned in its cradle. Is there merit to that versus how much these get driven? Not sure, but I thought what the hell, the swap is very simple with the clutch MC and it's the one that gets the most abuse. All that said, there were a couple of things to note when installing the Tilton:
- Fully seating the MC cap is extremely tight, even with a thin film of lube on the inside cap. It needs to go all the way down flush with the seat. Have some really strong hands or something to leverage against. Not sure why it needs to be so tight as it has an included clamp?
- Once the cap is on, it can't be rotated, so you need to have it pointing in the right direction or you'll need something to pry it off and start over again. There's a gasket there that needs to stay lubed to avoid tearing.
- The hose cap is larger than the Wilwood, and if not cocked off to one side you can't get a wrench on the upper mounting nut
- There is no flat spot for a wrench on the threaded rod that goes into the clevis. Might be difficult to remove on an assembled car
- It has an unnecessarily large clamp to hold the hose cap on. Not that you'd have to worry about it coming off
- A 5/16-24 thin nyloc nut is needed for the bottom as there is not enough thread due to the Tilton base being thicker
- The hose goes from 1/4 to 5/16, so you need to appropriate fitting on the reservoir and through the footbox hole
- I had to buy an additional 90-degree 3AN Male to 3AN Female swivel fitting for the braided hydraulic cable
- Took 5/8" off of the threaded rod, just like the Wilwood
All that said, the action of the pedal and MC is very nice and was it worth the change? We'll see!  I'm keeping the brake MCs Wilwood for now as it's a little more complicated to convert the brake line fittings to align with my brake line bends and I can get to those MCs easier if something needed to be changed out later. I'm also keeping my current Wilwood clutch MC as a backup if needed.


Last edited by cv2065; 03-18-2025 at 09:36 AM.
-
03-18-2025, 11:04 AM
#125
Now is the time to install ARP 100-1404 header studs. Makes installation of the gasket/headers a snap and protects the threads in your expensive aluminum heads.
https://www.summitracing.com/parts/a...1404/make/ford
-
03-18-2025, 11:14 AM
#126
Originally Posted by
Mike.Bray
Yes! I just installed these very studs, and it's dreamy!
Built an early MkIII years ago, sold years ago. Back after 18 years to build a MkIV
Build Thread Here Partners: Levy Racing, Summit Racing, LMR, Breeze, Forte's Parts, Speedhut, ReplicaParts
MkIV Complete Kit Ordered 4/18/23, Delivered 7/11/23, First start 3/15/25. Legal 6/13/25. Boss 427W, Edelbrock Pro Flo 4, TKX (.68 5th), IRS, Wilwood Brakes, 18" Halibrands, Toyo R888R Tires, Custom Speedhut Gauges
-
03-18-2025, 01:36 PM
#127
Originally Posted by
Mike.Bray
Although I'm a huge fan of ARP products, I used these locking nuts from Totally Stainless the last build and they never needed tightening. I also just needed to snug them up with a modified wrench as you all know, there isn't much room on the driver's side. The lock washers on these nuts act almost like a nord-lock washer as they lock together with just a little tightening.
https://shop.totallystainless.com/pr...eaderbolts.php
Now that I'm looking at them, they may very well indeed use Nord-Lock washers with their studs. Look identical. What length are the ARP bolts? 1" or 1-1/4"?
Last edited by cv2065; 03-18-2025 at 01:46 PM.
-
03-18-2025, 02:26 PM
#128
Originally Posted by
cv2065
Although I'm a huge fan of ARP products, I used these locking nuts from Totally Stainless the last build and they never needed tightening. I also just needed to snug them up with a modified wrench as you all know, there isn't much room on the driver's side. The lock washers on these nuts act almost like a nord-lock washer as they lock together with just a little tightening.
https://shop.totallystainless.com/pr...eaderbolts.php
Now that I'm looking at them, they may very well indeed use Nord-Lock washers with their studs. Look identical. What length are the ARP bolts? 1" or 1-1/4"?
FWIW
I'm not much of a fan of spring washers, split, lock, star, or any other gimmicks they've come up with in the name of "lock washers". If you think about the physics of keeping a bolt tight, how much tension would one of these little gadgets have to exert? What's commonly called a lock washer, a split washer, simply flattens out when tightened against, and at a very low torque. Hook's Law is what keeps bolts and nuts from coming loose. Don't believe me? When is the last time you saw any sort of lock washer in an engine or on an aircraft?
In the case of your headers you have a steel or stainless steel bolt threading into an aluminum cylinder head. First thing, if the female thread is a weaker material than the male thread, the hole in the cylinder head vs. the bolt, a coarse thread will be used. This helps but in this case when tightening a bolt into the head you are applying tension force as well as rotational forces against aluminum. With a stud threaded into the aluminum the only force the hole sees is tension as the nut is tightened onto the stud. A much better situation.
Positive locking header bolts like Stage 8 are a different matter as they physically prevent the bolt from rotating once installed.
-
Post Thanks / Like - 0 Thanks, 2 Likes
-
03-19-2025, 08:57 PM
#129
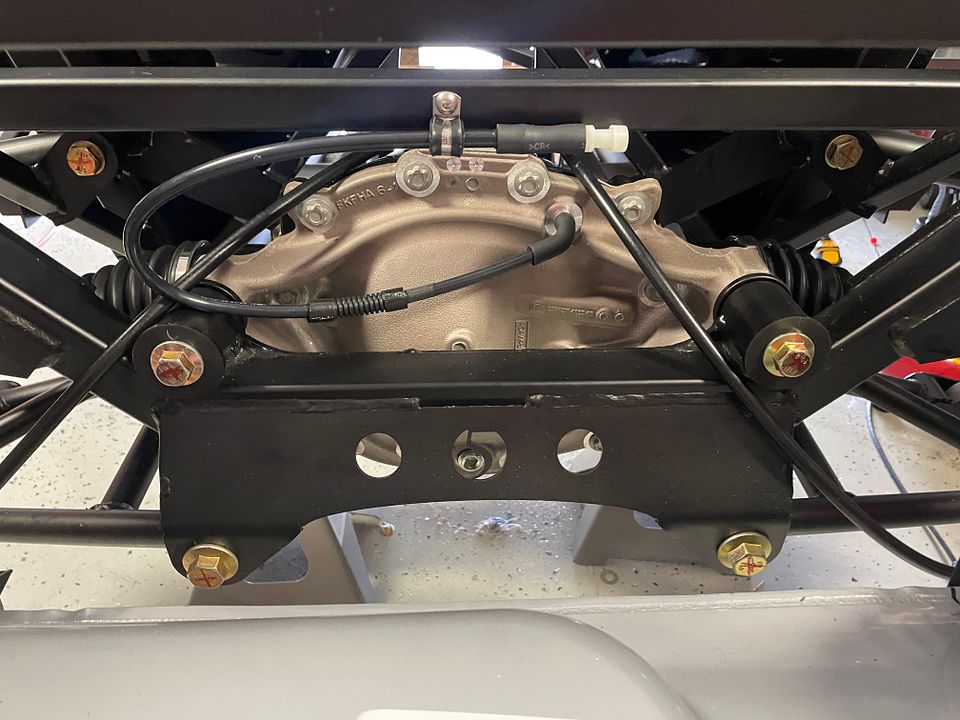
Horns, Cowl Cover and Metco Loop
Looks like my headers are on their way back from Georgie! Should have them by the first of next week, so I'm knocking out some of the smaller things prior to my first start.
Let's start with the horns. I was tempted to go outside and upgrade this to a blower type of horn, but I never had any issues with these and they are very easy to install. I had relocated my front harness over the top of the radiator so the horn wires needed to be extended. I keep every bit of wire that I cut out as I may need the color at another time. A mish mosh of different colored wires spliced together can get confusing. Not to say that I've never done it, but try to keep it all the same color as well as the same gauge or higher.


Next up was the Breeze radiator cowl cover. I had bought one of these for my last build but never installed as it seemed too much of a hassle after the body was on. I think I cut it up for some other fabricated items. I installed it this time and it comes powder coated! Nice extra there. I decided not to rivet this on. Due to the angle of the piece, if you needed to remove the radiator, you'd be hard pressed to pull out the top 3/4" tube bolts unless you drilled out the rivets and removed the cover. Rivnuts seemed excessive as there are 10 holes, so I tapped each hole for a 10-32 button head. With a little blue loctite, they hold just fine and will be easier to remove if that time ever comes.

And then we have the Metco driveshaft loop. Sometimes you just have to resign to the fact that every car is different and virtually nothing will go on as intended. This was one of those. Although nothing crazy difficult, it's just nice when things just "bolt up", which is maybe 30% of the time at best. 
The last time I installed one of these, it bolted up with no issues or modifications. I'm assuming that the number of shims that you put in for the driveshaft angle can impact this add on. So, not only did I have to cut the main bracket down by 1/4" in order for it to center on the driveshaft, but that also meant elongating the mounting holes and buying new, longer bolts all the way around. I also needed to create two 1/4" shims out of steel to raise the loop up just a bit off of the driveshaft. No room for error here as the bolts are threaded into the bracket and I can't imagine drilling this without a drill press. I have about 1" clearance and its barely touching my e brake cables. All good.


Last edited by cv2065; 03-21-2025 at 11:49 PM.
-
Post Thanks / Like - 0 Thanks, 1 Likes
-
03-20-2025, 06:47 AM
#130
I did a strip of bulb seal along the outer edge. I figured it might vibrate against the body. Probably not necessary but it's what I did
-
03-20-2025, 07:44 AM
#131
Originally Posted by
Blitzboy54
I did a strip of bulb seal along the outer edge. I figured it might vibrate against the body. Probably not necessary but it's what I did
Agree Jessie. I've read that some had issues with it flapping a little and making noise. I'll add some as well. Thanks!
-
03-20-2025, 08:27 AM
#132
Not a waxer

Chad,
That’ll need to be removed when you install the body.
Jeff
-
Post Thanks / Like - 0 Thanks, 1 Likes
-
03-20-2025, 08:45 AM
#133
Originally Posted by
Jeff Kleiner
Chad,
That’ll need to be removed when you install the body.
Jeff
You read my mind Jeff as I was just thinking about that and if it would interfere with the install. Thanks for the tip!
-
03-31-2025, 01:22 PM
#134
I finally got my headers back from Georgie at Gas N Pipes. Everything looks good and they fit up nicely! Again, just want to shout out at the customer service here as they had my pipes about 4 days and sent immediately back. As soon as I have my first start, they will come back off and get sent to the ceramic coaters.

While I was waiting, Mike Bray had recommended the 100-1404 header studs from ARP. I had never used studs before, only bolts, so thought I'd give them a try. Well, once I installed the studs, getting the headers on was a BREEZE! No more holding the header up to the head with the gasket, fumbling around with bolts and sweating bullets, especially on the drivers side. Popped up the gasket, laid the header on the studs and took my time with the nuts. Thanks for that tip Mike! Mike posted the link for them above, but here's a closeup.

One caveat is getting a socket on the spark plugs with the ARP studs, as a traditional socket gets hung up on the nut and will not freely rotate. Skinny socket to the rescue. I bought one of these with a swivel head from Amazon and gives me all of the clearance that I need. It also has a magnetic head. You can get it here: https://www.amazon.com/dp/B09769ZRV1...sin_title&th=1

I tried my best to get a first start this weekend, but it just wasn't in the cards. First off, the oil dipstick from Roush was too tall to get the headers over it, even after I bent it a bit, so I had ordered a 12" flex dipstick off of Amazon. It was not a Lokar, but pretty nice knockoff. I installed and it went on fine but it once fully installed, the rotation on the tube was not correct and was not able to secure it to anything as the attachment piece only rotated 180 degrees. I have since returned it and am waiting on the Lokar version to see if I have any better luck as it will rotate 360.
Secondly, we had a plumbing clog at the house that overflowed the bathroom shower stall and toilet on Saturday. This was a very 'sh...ty' situation.  Out came the 25-foot auger and still couldn't reach the clog, so a plumber will have to be in the cards. Anyway, the event 'soaked' up my entire Saturday.
So Sunday, thanks to the forum, I was getting ready to start loading some fluids for NEXT WEEK'S startup, and thought that I would go ahead and ditch the worm gear clamps on my cooling system and trade them out for black T-Clamps with black silicone hoses. YEAH, now we are talking as the Boig tubes are gloss black and will marry up nicely. It's all about the details! I should have that swapped out this week before the weekend.
I did get a chance to install the Roadster Tow Bar kit from one of the new forum vendors (FastCobra13). Really nice piece and took about 5 minutes to install. John (Fixit) made a quick video on it. I highly recommend it in case anyone has to take the walk of shame one fancy weekend and don't have to worry about damaging the body. I will keep it in the 'stowed' position on the car.

I was also trying to figure out how I'm going to mount my Intatrim seats. Turns out the Breeze seat bracket kit fits up perfectly. New holes will have to be drilled but no biggie. Really happy that worked out as Mark's seat brackets are the bomb!


Last edited by cv2065; 03-31-2025 at 01:36 PM.
-
Post Thanks / Like - 0 Thanks, 1 Likes
-
03-31-2025, 02:05 PM
#135
Are your headers on the 3" bolt spacing? That makes it so much nicer over the standard 2" spacing.
You know silicone coolant hoses will leak don't you? They're porous to coolant. Sorry
-
03-31-2025, 02:20 PM
#136
Originally Posted by
Mike.Bray
Are your headers on the 3" bolt spacing? That makes it so much nicer over the standard 2" spacing.
You know silicone coolant hoses will leak don't you? They're porous to coolant. Sorry
Yes, they are 3" bolt spacing and it does make it SO much easier. And thanks for the heads up on silicone. I'm aware of their porosity BUT, they do have new 4 ply versions so maybe those will be different. Sometimes, it's form over function Mike.
-
03-31-2025, 02:53 PM
#137
You might check out these clamps. I've used them and they're great. https://www.summitracing.com/parts/aaf-all30257
-
04-09-2025, 10:58 AM
#138
Hey Dude..... So are you able to get the sparkplug socket on to all of the plugs? On mine, one of the prototype sets of headers that I helped Georgie build, I have a plug that can not be removed with the headers installed. Just curious if he found the best fix for that. And it's all looking great..
-
04-09-2025, 02:22 PM
#139
Originally Posted by
BadAsp427
Hey Dude..... So are you able to get the sparkplug socket on to all of the plugs? On mine, one of the prototype sets of headers that I helped Georgie build, I have a plug that can not be removed with the headers installed. Just curious if he found the best fix for that. And it's all looking great..
Hey Carl. Yes, when I sent the headers back to Georgie to be honed again, Jeff Kleiner recommended that I ask him to check the spark plug clearance as well. I sent a not to Georgie and he double checked. All seems good!
-
Post Thanks / Like - 0 Thanks, 1 Likes
-
04-22-2025, 08:58 PM
#140
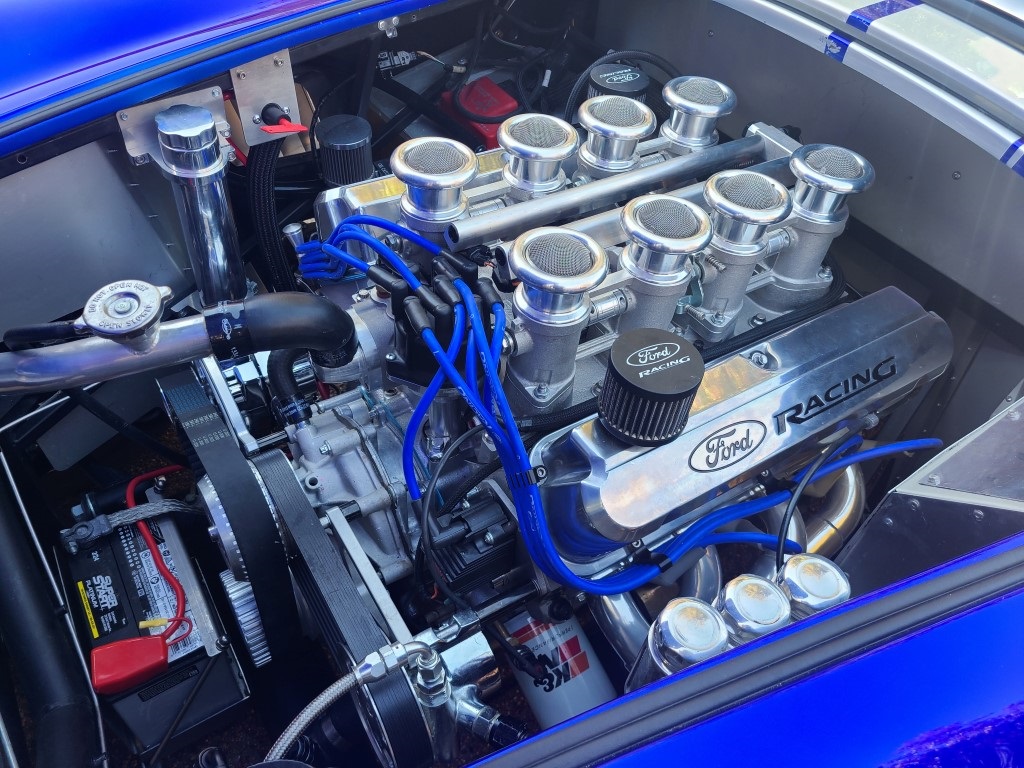
First Start!
Back to it! I got my headers back from Georgie and he did a great job honing them again and ensuring that I had spark plug clearance for the socket. 3-day turnaround. Not too shabby! The special swivel socket that I bought will get to every spark plug and have enough room to apply a torque value because I'm anal like that.
I have had a few minor annoyances lately leading up to the first start.
Sensors: My Speedhut oil pressure sensor harness died. Great customer service there as they sent me a new harness in 2 days. Running that again was a real PITA. Good thing I still used electrical tape on that harness because shrink is a beast to remove. My fuel gauge also has some sort of issue. I can calibrate it to the 16-158 ohms setting, but it just goes to zero. When I calibrate to 0-30 ohms, it looks like its registering just about the right amount of fuel in the tank (4 gallons was a little over a quarter tank). It will also register a tank reading in every other calibrated setting, except 16-158. I need to pull the sender and test it so on the to do list.
Leaks: Accidentally tested the fuel system, as I had the radio on while I was calibrating the gauge and forgot that I had plugged the fuel pump in. Heard a slight humming under the music and then the games began! I had a major geyser coming out of the front fuel log where the end is capped as well as a leak at the pump feed. NO BUENO!! I had planned on a final tightening check before the test, but sometimes things don't go as planned. A little high temp sealant at the front and I used a conical seal from Earls on the fuel hangar fitting. Not sure that I needed one, but it worked great. One thing that I did learn in this is that AN ORB fittings are to screw all the way down to the base of the fitting, to where the o ring virtually disappears into the recess. If it doesn't disappear, then there is an issue. I also lubricate them with silicone grease. Another thing I learned was to NOT use Evil Energy stuff. Started out liking them but two sets of fuel hose that did not match their fittings and the o-rings on the ORB fittings I got were too small and caused leakage. Mileage may vary, but I'm out. I also had a couple of minor leaks on the silicone hoses. First time I have used silicone hoses, and they seem to need more tightening versus a rubber hose but look great. 
First start flight check:
- My Canton oil pan is 7 quarts, so that's what went into the engine. I used Lucas Break In oil SAE 30 weight. Did I need a break in oil with a roller cam? No, but Blueprint recommends it for their engines, so I said why not.
- Filled PS reservoir with Honda power steering fluid. The dealer has it for $5 a quart.
- Filled the radiator with coolant (50/50) from Wally World at the filler neck. Lifted the front end on jack stands. Opened the top draincock on the radiator. Filled until it came out then closed that up. Continued to fill periodically as I let the bubbles escape from the intake over a period of a couple hours. I also filled my overflow tank halfway with coolant. Dropped the car back to level.
- Manually rotated the engine to 16 BTDC, pulled the distributor cap and marked the position of the rotor towards #1 terminal as well as the position of the base to the intake. I did use the finger in the #1 spark plug hole method to ensure I was on the compression stroke.
- Pulled the distributor and oil primed the engine spinning counterclockwise with oil priming tool. Oil pressure gauge registered 68 psi. NICE, BUT I smoked my 7A drill and it wasn't even cordless. The Craftsman tools just aren't what they used to be!
- Re-installed distributor. Lubed up the distributor gear beforehand and had to rotate the pump by hand with the primer tool a couple of times for it to engage the gear perfectly right back to #1. Rotated the housing back to my mark on the intake and locked it down.
- Re-installed spark plugs and headers.
- Removed air cleaner and grabbed my trusty timing light, fire extinguisher, damp towels (just in case), power steering fluid and coolant jugs for top off and called the neighbor for another set of eyes and possible damage control. Ready for lift off!
Fuel pump on...no leaks....CHECK!
Crank engine. Key and push button work great...CHECK!
High torque starter almost sounding like a high tech semi truck starter....CHECK!
Blip the throttle one time to prime....CHECK!
Too long of an ignition coil wire because I had to get a quick temporary replacement (Power Tower to the rescue) as Roush doesn't provide one and I found out last minute....CHECK!
Turned the key and BOOM! Scared my neighbor and the dogs ran to the back bedrooms. It's ALIVE and sounds glorious! Listen to those tappity tap drums!! Lars Ulrich would be proud!!
https://youtu.be/2JjCCNI--Co
Checked the timing and settled at 16 degrees BTDC at idle to avoid any coughing through the carb at shut down. Starts right up and shuts down nicely now but need to still get the vacuum gauge out and fine tune the carb, the all in timing as well as the idle. I'm sitting at 900 right now, which is not too bad. Also looks like I have a 195 degree thermostat and when my auto fan comes on, the billet button LED also comes on. COOL!
Big milestone completed and once I get the body on, things are going to speed up. As always, thanks to everyone on the forum for their input and advice.
Last edited by cv2065; 09-07-2025 at 04:22 PM.
-
Post Thanks / Like - 0 Thanks, 4 Likes
-
04-22-2025, 10:57 PM
#141
That looks and sounds amazing! Well done sir!
-
Post Thanks / Like - 0 Thanks, 1 Likes
-
04-23-2025, 05:16 AM
#142
OOOOOOHHH YEAAAAH!!(think Macho Man Randy Savage!) That sounds great!! OK, now I can come over to see it!!
Higgy
MK4 #11354 picked up 10/06/25
MK4 #11173 picked up 01/20/25
MK4 #11012 picked up 04/16/24 SOLD
MK4 #10616 picked up 4/10/23 SOLD
MK4 #9759 picked up 4/3/19 SOLD
-
Post Thanks / Like - 0 Thanks, 1 Likes
-
04-23-2025, 05:58 AM
#143
You guys and your open header first starts... My ears (and neighbors) don't appreciate it. Hopefully you had protection for at least one of those. ") Congratulations BTW.
Congratulations BTW.
Build 1: Mk3 Roadster #5125. Sold 11/08/2014.
Build 2: Mk4 Roadster #7750. Sold 04/10/2017.
Build 3: Mk4 Roadster 20th Anniversary #8674. Sold 09/07/2020.
Build Thread and
Video.
Build 4: Gen 3 Type 65 Coupe #59. Gen 3 Coyote. Legal 03/04/2020.
Build Thread.
Build 5: 35 Hot Rod Truck #138.
Build Thread. Sold 11/9/2023.
Build 6: Mk5 Roadster 30th Anniversary #11,258.
Build Thread.
-
Post Thanks / Like - 0 Thanks, 2 Likes
-
04-23-2025, 06:39 AM
#144
Originally Posted by
Higgybulin
OOOOOOHHH YEAAAAH!!(think Macho Man Randy Savage!) That sounds great!! OK, now I can come over to see it!!
Higgy
Anytime Higgy!
-
04-23-2025, 06:40 AM
#145
Originally Posted by
edwardb
You guys and your open header first starts... My ears (and neighbors) don't appreciate it. Hopefully you had protection for at least one of those.
Congratulations BTW.
Lol. Thanks Paul. I did get some visits. 
-
04-23-2025, 07:05 AM
#146
Not a waxer
-
04-23-2025, 07:06 AM
#147
Originally Posted by
Jeff Kleiner
Congrats Chad!
Jeff
Thanks Jeff!!
-
04-23-2025, 09:28 AM
#148
That engine looks amazing. Real work of art.
-
Post Thanks / Like - 0 Thanks, 1 Likes
-
04-23-2025, 09:40 AM
#149
Congrats! Great milestone. Looks and sounds awesome. I remember my first start in my MkIII with open headers. Scared the crap out of me...I didn't expect it to be that loud. I quickly shut it off and slapped the sidepipes on it.
Greg
Built an early MkIII years ago, sold years ago. Back after 18 years to build a MkIV
Build Thread Here Partners: Levy Racing, Summit Racing, LMR, Breeze, Forte's Parts, Speedhut, ReplicaParts
MkIV Complete Kit Ordered 4/18/23, Delivered 7/11/23, First start 3/15/25. Legal 6/13/25. Boss 427W, Edelbrock Pro Flo 4, TKX (.68 5th), IRS, Wilwood Brakes, 18" Halibrands, Toyo R888R Tires, Custom Speedhut Gauges
-
Post Thanks / Like - 0 Thanks, 1 Likes
-
04-25-2025, 06:28 PM
#150
Wow Chad. That sounds amazing
-
05-11-2025, 07:26 PM
#151
Originally Posted by
cv2065
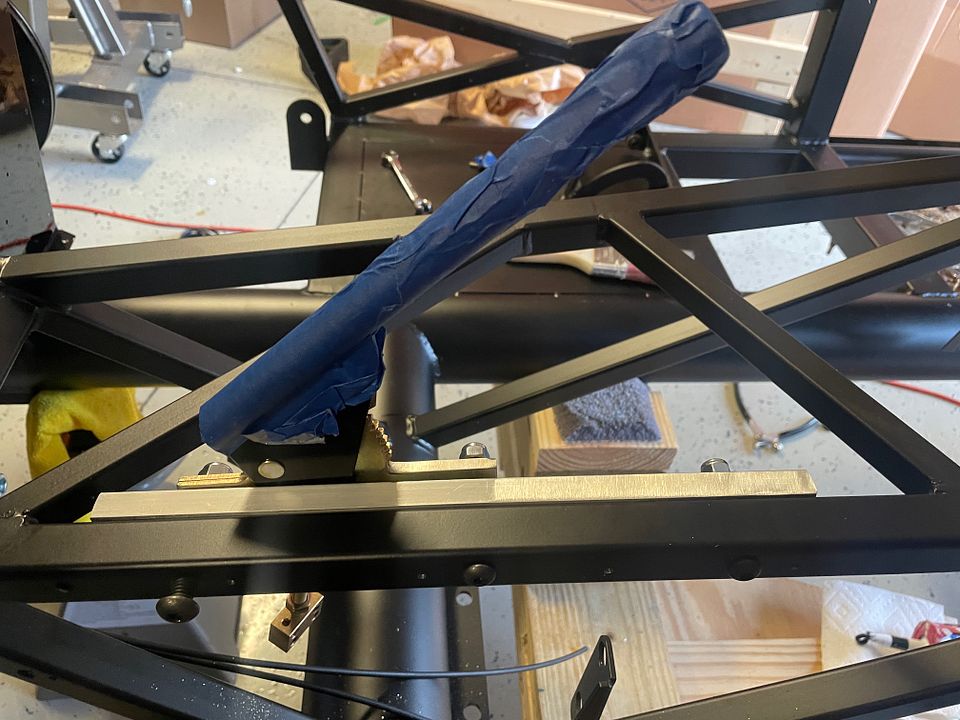
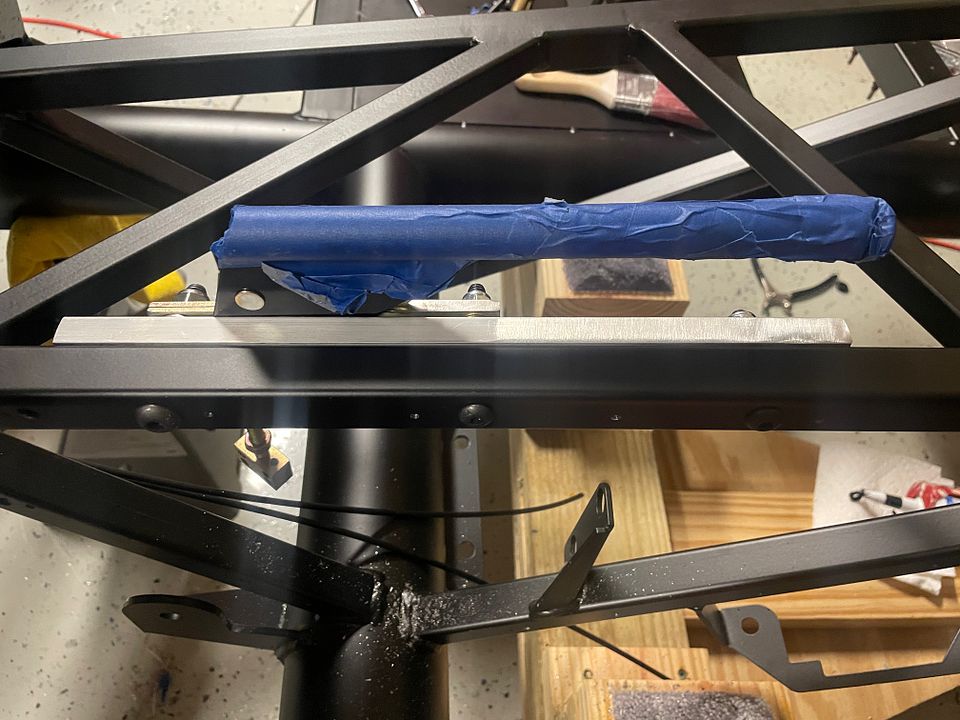
I decided that I wanted the e-brake on the top of the tunnel this time around as I'm going to be using the mid-shift kit from Forte. Thanks to Mike Craven and his outstanding build for the visual. Lots of different ways to do this on the forum, so I started down the road of making this much more complicated than it needed to be. At the recommendation from Wallace18, I bought the blacked out Lokar Kit (Model XEHB-700F) from Speedway Motors. This came with the handle assembly, clevis, boot and also the trim ring, which is a nice bonus, as they are hard to find.
I wanted to put the handle as far back on the tunnel as possible on the passenger side, but there's not much room as the supports come together at the corner. The handle was to be mounted through the 1" tubing and needed to be spaced out, so I bought a 12" x 1", 1/4" thick plate of aluminum to serve as the spacer and help support the tubing. The tunnel tubing is not that thick so I thought bolstering it up a bit and spreading the load over a foot would help with the stress of pulling up on the handle.
I then drilled 5/16" holes through the tubing, spacer and secured with a bolt through the lokar handle mounting holes. I now have a drill press, and man did that make things easy!
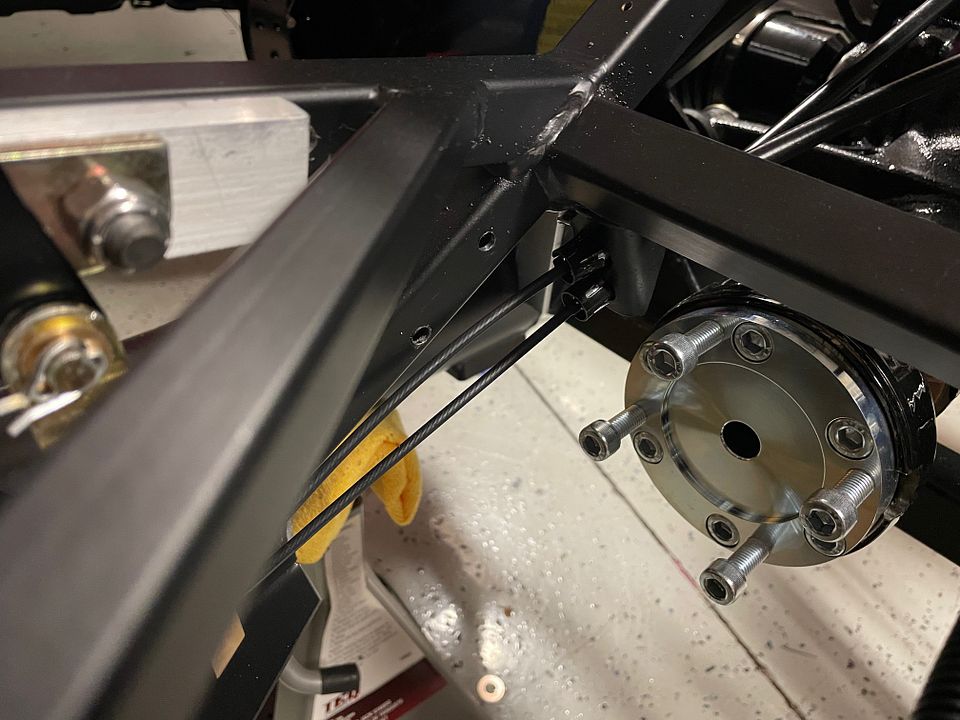

I used the FFR supplied cables that i ran over the IRS and connected right into the frame bracket and will be secured into the clevis. Not much slack between the bracket and clevis and the angle seems doable. MSummers has a similar setup that works fine.
Then they run to the Wilwood calipers. Again, this setup is SO much better than the Mustang calipers that I had before. Getting the ebrake to work with a custom spring, etc., was a bit tedious. The Wilwoods come with a connecting bracket and the e brake cable fit right up into the channel and I secured with an E clip.
Final testing still needed, but I like how its routed and hopefully will get much better engagement that what I had before. I will be cutting off the FFR e brake bracket from the frame so that I can create a flush patch panel.
Hi Chad...have you had the opportunity to test the e brake with first start? I'm considering a similar setup with the Lokar handle for driver side location and added cable mounting bracket. Any issues trimming out the tunnel top cover and button head screws used for mounting the handle?
Jen
MK4 complete kit, IRS, Ford Strokers 347 (carb & mechanical fuel pump), TKX, PS, heater-defroster-wipers, firewall forward, 11.65 rear brakes, 17" Halibrands, #11124.
Ordered: 9.8.2024
Delivered: 10.31.2024
-
05-12-2025, 11:19 AM
#152
Originally Posted by
jengum
Hi Chad...have you had the opportunity to test the e brake with first start? I'm considering a similar setup with the Lokar handle for driver side location and added cable mounting bracket. Any issues trimming out the tunnel top cover and button head screws used for mounting the handle?
Hi Jen. I haven't had it out on the road yet, but initial testing is good where it's holding tightly. No issues trimming the cover, you just have to trace it all out and account for the action. Another consideration when cutting your hole is being able to get the cover off without having to disassemble the entire thing. You can cut notches out of the floor panel to accommodate the button heads so they don't stick out. There is no interference with the cover, even with insulation.
-
05-18-2025, 06:34 PM
#153
-
Post Thanks / Like - 0 Thanks, 1 Likes
-
05-18-2025, 06:52 PM
#154
-
Post Thanks / Like - 0 Thanks, 1 Likes
-
05-18-2025, 08:46 PM
#155
Dash!
The dash placement this time around was a little different than the last build. With the vinyl dash, I did put the body on in advance but I had already roughly fitted the dash to where the ends were 3/16" lower than the ends of the hoop and then used the body to determine where my mounting holes would go. Only issue was that in one area of the dash, you could see the hoop once it was all installed. I'm not sure why that happened but wanted to avoid it this time.
This time I put the body on, then pushed the dash up as far as I could get it and marked the lip. Then I decided where the mounting holes were going to go. I did cut the same L brackets and riveted them to the bottom of the hoop to give me a place to mount so that the lip did not cover them, which makes quick removal of the dash in the future an issue.
Because I'm using larger gauges, my L brackets could not be symmetrical across the dash, so this time I think I may only use 2 screws to hold the dash, and with Everson's under dash panel on the passenger side and an extra underneath bracket on the driver's side, it will be extremely solid. I'll use the same black chrome 10-32 button heads as last time, but they won't be a highlighted part of the dash. I just want them to blend in.
My dash ended up about flush with the driver's side hoop end, but was about 1/8" above the hoop on the passenger's side and it is perfectly level at the bottom and aligns right in the middle of the steering wheel cutout. It definitely pushed up more on the passenger side. I was still showing about 1/8" of hoop just above the Speedometer, and didn't want to go any lower than that due to my previous experience, so I trimmed about 3/16" off the driver's side end to avoid any body interference. All fits perfectly. I had the body on and off 3 times to verify the fitment and it was always the same, so I'm very happy with it.


I'm going to have the mobile welder out on Friday or Monday to get my Breeze roll bar TIG welded. I should be ready for go-karting within the next two weeks. Just have to bleed my clutch and install the ie427 steering column and wheel.
Last edited by cv2065; 05-19-2025 at 09:53 AM.
-
Post Thanks / Like - 0 Thanks, 2 Likes
-
05-23-2025, 07:10 PM
#156
Mobile welder came out today to take care of my roll bar and I was so excited to get this completed. My friend Michael Craven (aka Hacksaw) and I were parked side by side at a car show a couple of years ago and he looked over and said, you've got the 'paperclips'. I said, how do you mean? He says the 1.5" rollbars; they are skinny and tall. Once you see it, you can't unsee it. Of course, Michael had the 2" old rollbars that he cut down by 2" in height. And he was right...I couldn't unsee it.
So I said on the next build, I'm going to change that, and it was Breeze to the rescue. I really love Mark's 1.75" lowered raked version and had to have it. The welder came to my house and TIG welded the third leg in about 30 minutes. He could have finished sooner, but some surgery needed to be done at the top of the third leg as it did not fit flush and had a gap. So he carved out the other side to where it fit flush and bam, it was history.
Gap originally looked like this and can't be TIG welded as is.

Did a little surgery and finished product.


Once I get the body back on I'll size the holes and get this powder coated. As a side note, I did ensure that I disconnected the battery as well as the MSD box, just to be on the safe side. The welder said he works on race cars and fuel tanks (with fuel) all the time and it wasn't really necessary with his setup but good to be cautious as well.
Last edited by cv2065; 05-23-2025 at 07:35 PM.
-
Post Thanks / Like - 0 Thanks, 2 Likes
-
05-23-2025, 07:17 PM
#157
Hacksaw’s car is why I went with a 2” roll bar. Your welder did great work. Crushing it Chad.
-
Post Thanks / Like - 0 Thanks, 1 Likes
-
05-23-2025, 07:29 PM
#158
Originally Posted by
Blitzboy54
Hacksaws car is why I went with a 2 roll bar. Your welder did great work. Crushing it Chad.
And yours is why I went with the 2" roll bars. The extra girth dramatically reduces the paperclip look, even at the same height.
-
Post Thanks / Like - 0 Thanks, 2 Likes
-
05-23-2025, 07:44 PM
#159
Originally Posted by
Blitzboy54
Hacksaw’s car is why I went with a 2” roll bar. Your welder did great work. Crushing it Chad.
Thanks Jessie! I love the 2" as well. Hacksaw's dual bars look awesome. He lowered his by I think 2" and it looked to be some major surgery on his Instagram build thread, so I went with the Breeze bar instead.
-
05-28-2025, 12:22 PM
#160
-
Post Thanks / Like - 0 Thanks, 1 Likes


 Thanks:
  Likes:


 Reply With Quote


