-
 Setting Carbon Fiber Dash for Roadster
Hi - I have the carbon fiber dash with the drop-section for the ignition, heater, wiper, etc... I also have the Russ Thompson turn signal system. The carbon fiber dash instructions don't talk about alignment with the top 3/4" square tube. In the general roadster instructions, however, the (aluminum) dash instructions state: "Line the dash up with the hoop on the chassis. The corners of the dash support tube are 3/16 below the top edge of the dash. The tube will be lower as it goes to the middle."
Question: Would anyone know if this is same guidance for the carbon fiber dash? Should I place it so that each corner is 3/16" higher than the 3/4" square tube behind it?
I've made a template from 1/8" MDF, so I'd like to clamp it as close as possible to what the carbon fiber dash will require. I'll then be able to measure for the center of the steering column with the RT turn signal system.
Thanks!
32J
-
I followed the directions of Jeff Kleiner and folks on the site to set the center just below the hoop ( I forgot the actual distance they recommend. Just do a search) and everything worked out great on mine.

Last edited by nucjd19; 08-20-2022 at 02:08 PM.
FFR MK4 Roadster (9945) complete kit, delivered 12/4/2020, First start and go kart 5/7/2021. Legal 8/14/2021, Paint finished 7/18/2022 (Viking Blue). 347BPE CI, TKO600, Moser 8.8 3link 3.55, Halibrand 17x9 17x10.5, power steering. Carbon Fiber Dash. Carbon Fiber trans tunnel, adjustable Kirkey Lowback Vintage seats, Vintage gauges, RT drop trunk mod, FFmetal drop battery mod and trans tunnel, Forte front sway bar. Forte mechanical throttle linkage, RT gas pedal.
www.covespringsfarm.com
-
Post Thanks / Like - 1 Thanks, 1 Likes
 32J
32J thanked for this post
-
I did the same as nucjd19 - the top edge of my CF dash is basically level with the top of each end of the 3/4" square tube.
Mk4 Roadster #9974 - Picked Up 1/2021. Complete kit, Gen 2 Ford Coyote / TKX, IRS. Completed 9/2023
-
Post Thanks / Like - 1 Thanks, 1 Likes
32J thanked for this post
-
I asked this question on the FFR Builder Facebook page and got a lot of good tips. I ended up following the advice of some very experienced builders: Basically pushed the dash up as high as I could until the glove box hit the underside of the frame hoop. Then used a level to make sure it was straight horizontal (set level on the lower bump-out on the dash). Top edge of dash is just about flush with the top of the hoop. DS is right at the hoop corner, and PS is slightly above.... maybe 1/8". Fair warning: I haven't mounted the body yet to confirm no fit issues but seems like this method should work.
Darryl [dbo_texas]
MKIV #9644 (build thread) (Index)
MK4 Complete Kit | Gen2 crate Coyote | Tremec T56, 3.55 IRS | power steering | hydroboost | dual roll bars | FFR carbon fiber dash | 18" Halibrands + Wilwoods | RT drop trunk kit & turn signal | front battery mount | saddle leather Intatrim Stoneleigh seats + interior accents
-
Post Thanks / Like - 1 Thanks, 0 Likes
32J thanked for this post
-
Have you all had to cut the curved end tabs on yours? Particularly on the passenger side where it conflicts with the small dash extension.
Thanks,
#10333 Complete Kit, Carbed 427w, TKX, IRS and many other upgrades
- Order Date: September 11, 2021 - 20th Anniversary of 9/11
- Delivery Day: April 1, 2022 - April Fool's Day
- First Start and Go-Kart: January 20th, 2023
- Graduation Date: July 4th, 2023 - Independence Day!!
- Legal Registration Date: October 4, 2023 - My Birthday!!
Visit my MKIV Build Thread (#10333)
-
I cut 2" off PS tab, but mine was also aluminum, not CF.
-
Post Thanks / Like - 1 Thanks, 0 Likes
Ted G thanked for this post
-
How are the ends of the CF dash panel secured. A
Photo would help
-
Post Thanks / Like - 0 Thanks, 2 Likes
-
Not to hijack change topics, has anyone found the FFR instructions on where to cut the gauges and steering column hole on their CF dash incorrect? I followed the directions and I found that I was off.
MK IV Roadster, 427 Fuel Injected HO Stage 2 by BP, Tremec TKO 600, 2015 IRS, Wilwood Brakes, 25th Anniversary Wheels
-
Post Thanks / Like - 0 Thanks, 1 Likes
-

Originally Posted by
Ted G

Have you all had to cut the curved end tabs on yours? Particularly on the passenger side where it conflicts with the small dash extension.
Thanks,
Yes - I modified both of the curved ends. I used a Dremel tool with a drum sander to notch out both ends. Carbon fiber is very easy to shape with a sander. On the PS I also had to take off some material from the bottom edge so it wouldn't interfere with the door hinge. Below is a picture of the DS, but the PS is essentially the same.

Mk4 Roadster #9974 - Picked Up 1/2021. Complete kit, Gen 2 Ford Coyote / TKX, IRS. Completed 9/2023
-
Originally Posted by
MVTV
Not to hijack change topics, has anyone found the FFR instructions on where to cut the gauges and steering column hole on their CF dash incorrect? I followed the directions and I found that I was off.
I had reservations about using the FFR template to determine the steering column hole. I ended up mounting the CF dash to the hoop with the steering column pushed forward. Once the dash was mounted, I then slid the steering column until it hit the back of the dash and traced the outline with a silver Sharpie so I had the exact location. If you plan to use the Russ Thompson turn signal, you should install the bracket first as it will elevate the steering column and change the location of the dash hole.
James
Mk4 Roadster #9974 - Picked Up 1/2021. Complete kit, Gen 2 Ford Coyote / TKX, IRS. Completed 9/2023
-
Originally Posted by
Malibu46pt
How are the ends of the CF dash panel secured. A
Photo would help
The CF dash is so rigid I did not feel the need to secure the ends. The dash does come with aluminum right angle brackets, but I decided not to use them.
Mk4 Roadster #9974 - Picked Up 1/2021. Complete kit, Gen 2 Ford Coyote / TKX, IRS. Completed 9/2023
-
Originally Posted by
Lidodrip
The CF dash is so rigid I did not feel the need to secure the ends. The dash does come with aluminum right angle brackets, but I decided not to use them.
Do you have them on the inside of the door hinges? I had to cut the PS about an inch.
#10333 Complete Kit, Carbed 427w, TKX, IRS and many other upgrades
- Order Date: September 11, 2021 - 20th Anniversary of 9/11
- Delivery Day: April 1, 2022 - April Fool's Day
- First Start and Go-Kart: January 20th, 2023
- Graduation Date: July 4th, 2023 - Independence Day!!
- Legal Registration Date: October 4, 2023 - My Birthday!!
Visit my MKIV Build Thread (#10333)
-
Originally Posted by
Ted G
Do you have them on the inside of the door hinges? I had to cut the PS about an inch.
Here is a picture of the PS which shows where it falls in relation to the hinge. I did not need to cut any material off the end of the dash, just notched it out. When the doors are closed, the apex of the hinge arms are underneath and inside the end of the dash by about 1". I did need to sand a small amount of the bottom edge of the dash on the PS so the hinge would not contact the dash when closing. I am in the process of fitting the body right now and I have not run into any issues.

Mk4 Roadster #9974 - Picked Up 1/2021. Complete kit, Gen 2 Ford Coyote / TKX, IRS. Completed 9/2023
-
Post Thanks / Like - 0 Thanks, 1 Likes
-
Forgive me if I'm telling you something you already know, but CF dust is really bad for your lungs & eyes. A mask & eye protection when sanding can save you a lot of heartache.
John
MK IV Roadster #8631
Ford 302, Holley Terminator EFI, T5z, 3.55 Rear End, IRS, 17 Halibrand Replicas (9 front, 10.5 rear), Nitto 555 G2s (275/40ZR17 front, 315/35ZR17 rear), Fast Freddies Power Steering, F5 Wilwood Brakes, FFMetals Firewall Forward, Fortes Hydraulic Clutch & Throttle Linkage
https://www.ffcars.com/threads/phile.../#post-4776313
-
Post Thanks / Like - 1 Thanks, 1 Likes
Ted G thanked for this post
-
25th Anniversary #9772

so it seems a few of you let the CF dash sides hang free with modification and others have attached to the windshield mount area... my gut feeling is that the CF dash has a lot of preload tension if you bend the sides in, and nothing came to mount the dash
the FFR instructions to mount are um... bleak to say the least
final-assembly-dash.png
so is the recommendation to trim the edges and let hang? or affix to the sides?
-
I'm planning to leave the ends hanging free (i.e. not using the little "L" brackets that came with it). My dash will be secured with the lower filler panel + 3M dual-lock strips. No visible fasteners, and I'm pretty sure it will be rock solid with this setup.
Darryl [dbo_texas]
MKIV #9644 (build thread) (Index)
MK4 Complete Kit | Gen2 crate Coyote | Tremec T56, 3.55 IRS | power steering | hydroboost | dual roll bars | FFR carbon fiber dash | 18" Halibrands + Wilwoods | RT drop trunk kit & turn signal | front battery mount | saddle leather Intatrim Stoneleigh seats + interior accents
-
Post Thanks / Like - 0 Thanks, 1 Likes
-
25th Anniversary #9772
Originally Posted by
dbo_texas
I'm planning to leave the ends hanging free (i.e. not using the little "L" brackets that came with it). My dash will be secured with the lower filler panel + 3M dual-lock strips. No visible fasteners, and I'm pretty sure it will be rock solid with this setup.
I have a lower dash mount and using the locking velcro 3M strips - never received any L-brackets though, maybe they've added them recently?
-
Possibly - I ordered my CF dash over a year ago. The instructions don't mention the L brackets (or didn't at the time I assembled it) but feedback I got from the forum is that this is what they are for. Currently they are sitting in the jaws of my bench vice so I have nice flat soft aluminum surfaces to grab my AN fittings with from when I built up my PTFE fuel line 
Darryl [dbo_texas]
MKIV #9644 (build thread) (Index)
MK4 Complete Kit | Gen2 crate Coyote | Tremec T56, 3.55 IRS | power steering | hydroboost | dual roll bars | FFR carbon fiber dash | 18" Halibrands + Wilwoods | RT drop trunk kit & turn signal | front battery mount | saddle leather Intatrim Stoneleigh seats + interior accents
-
Post Thanks / Like - 0 Thanks, 1 Likes
-
25th Anniversary #9772
Originally Posted by
dbo_texas
Possibly - I ordered my CF dash over a year ago. The instructions don't mention the L brackets (or didn't at the time I assembled it) but feedback I got from the forum is that this is what they are for. Currently they are sitting in the jaws of my bench vice so I have nice flat soft aluminum surfaces to grab my AN fittings with from when I built up my PTFE fuel line
I used this for my vice for the AN fittings Magnetic Aluminum Vise Soft Jaw Insert - AN Fitting Hose Assembly
my CF dashboard arrived with the 25th kit about 3 years ago, I was one of the original recipients before they gave the updated template for the steering wheel cutout... whole other story but fixed now
Last edited by toadster; 04-17-2023 at 05:45 PM.
-
Originally Posted by
nucjd19
I followed the directions of Jeff Kleiner and folks on the site to set the center just below the hoop ( I forgot the actual distance they recommend. Just do a search) and everything worked out great on mine.
Where did you get that sweet chrome grommet around the steering column?
-
Those come from Mike Everson at Replica Parts. Mike is a vendor here. Great guy.
Dave
MK4 Complete kit FFR9939. Gen 1 Coyote, Tremec 3650, IRS 3.31 ratio, Breeze radiator stuff, Breeze cubby and battery mount, North Race Cars heat and A/C, RT drop trunk kit, Replica Parts radiator aluminum and brake booster spacer, FFR soft top.
-
Resurrecting the thread. I am on the dash portion and have a question. The center of the dash does not match the top of the tubing and if I set it lower the ends of the dash are banging into the side door mounts. Is the general consensus to notch or cut the side arms so the dash fits center?
Also does the body rest completely on this steel tubing? Because if I raise the dash some in the middle the sides move above the steering wheel and glove box slightly above the tubing.
IMG_3178.jpgIMG_3180.jpgIMG_3179.jpg
10/29/25 MK4 Delivery Day
-
On the aluminum dash I followed the advice of this thread and it fit perfectly. The CF dash I do the same and regret it. I think it needs to be higher. I notched the sides for the door hinge but more importantly you can see the top of the dash with the body on. My painter is going to thicken the cowl a bit to compensate.
If I were to do it again I would follow Chad’s lead and put the body on, set the dash to it then start installing gauges and such.
The body doesn’t sit on the dash hoop. It sits on the firewall.
-
Originally Posted by
Blitzboy54
On the aluminum dash I followed the advice of this thread and it fit perfectly. The CF dash I do the same and regret it. I think it needs to be higher. I notched the sides for the door hinge but more importantly you can see the top of the dash with the body on. My painter is going to thicken the cowl a bit to compensate.
If I were to do it again I would follow Chad’s lead and put the body on, set the dash to it then start installing gauges and such.
The body doesn’t sit on the dash hoop. It sits on the firewall.
Ok thanks for the info! Ill just plan on zip tieing it up until I get the body on the car. Cant wait to see yours when it gets back from paint!
10/29/25 MK4 Delivery Day
-
Post Thanks / Like - 0 Thanks, 1 Likes
-
Originally Posted by
LSX
Ok thanks for the info! Ill just plan on zip tieing it up until I get the body on the car. Cant wait to see yours when it gets back from paint!
Glad to see you guys moving along with your builds. I got the engine in the car yesterday which was exciting and fairly straightforward. I also am having trouble with my carbon dash. I got it all finished and went to test fit it in the car and the glovebox back hits the dash support member when lining up the steering shaft hole, so I either need to cut some of the glove box or make the steering hole bigger, but then again I am not really sure where center is.
-
I placed mine as high as it could go, the glove box is about 1/8 inch or less from hitting the hoop. For the side, it did require trimming and shaping. I had an interference with the top of the dash and the body on the end due to curving the dash and securing it instead of letting the sides float, but will probably require some dremel work on the ends. don't put a hole in the center if you have stripes, I took liberty to put 2 offset holes so hopefully it won't be noticeable if the are not exact.
Dash Alignment.JPGGrab Handle 2.JPGPassenger door done.JPG
-
Post Thanks / Like - 0 Thanks, 1 Likes
-
Originally Posted by
JohnnyDeere
Glad to see you guys moving along with your builds. I got the engine in the car yesterday which was exciting and fairly straightforward. I also am having trouble with my carbon dash. I got it all finished and went to test fit it in the car and the glovebox back hits the dash support member when lining up the steering shaft hole, so I either need to cut some of the glove box or make the steering hole bigger, but then again I am not really sure where center is.
Its moving along now that I got all my parts in. After I run the wiring Im going to be installing the engine. Almost to Go Kart mode!
I havent messed with the glove box yet but Ive decided to go with the 3M locking velcro tabs till I get the body mounted. Those things can hold up anything.
10/29/25 MK4 Delivery Day
-
Originally Posted by
F500guy
I placed mine as high as it could go, the glove box is about 1/8 inch or less from hitting the hoop. For the side, it did require trimming and shaping. I had an interference with the top of the dash and the body on the end due to curving the dash and securing it instead of letting the sides float, but will probably require some dremel work on the ends. don't put a hole in the center if you have stripes, I took liberty to put 2 offset holes so hopefully it won't be noticeable if the are not exact.
Dash Alignment.JPGGrab Handle 2.JPGPassenger door done.JPG
Thanks for the pictures! helps out a lot for sure. Love the look of your setup.
10/29/25 MK4 Delivery Day
-
Originally Posted by
JohnnyDeere
Glad to see you guys moving along with your builds. I got the engine in the car yesterday which was exciting and fairly straightforward. I also am having trouble with my carbon dash. I got it all finished and went to test fit it in the car and the glovebox back hits the dash support member when lining up the steering shaft hole, so I either need to cut some of the glove box or make the steering hole bigger, but then again I am not really sure where center is.
The alignment jig they give you with the dash doesn't match the steering shaft, at least mine didn't. I used Franks turn signal so it covered up for the original "miss".
-
Originally Posted by
Blitzboy54
The alignment jig they give you with the dash doesn't match the steering shaft, at least mine didn't. I used Franks turn signal so it covered up for the original "miss".
Awesome
sarcasm exposed.
-
Originally Posted by
Blitzboy54
The alignment jig they give you with the dash doesn't match the steering shaft, at least mine didn't. I used Franks turn signal so it covered up for the original "miss".
Good to know. I think I want go with the competition layout, so might be on my own for the gauges but figured the jig would work for the steering shaft hole. I definitely don't want to screw up with the carbon fiber...
-
Originally Posted by
CW_MI
Good to know. I think I want go with the competition layout, so might be on my own for the gauges but figured the jig would work for the steering shaft hole. I definitely don't want to screw up with the carbon fiber...
The one good quality I may have is that I am a woodworker with a CNC so I am going to make a nice wooden bezel around whatever the hole ends up being….still a pain but part of the adventure I guess.
-
Post Thanks / Like - 0 Thanks, 1 Likes
-
Correct on jig not working. I put the steering shaft in and then drew where it landed on the dash before I cut that hole.
-
Post Thanks / Like - 0 Thanks, 1 Likes
-
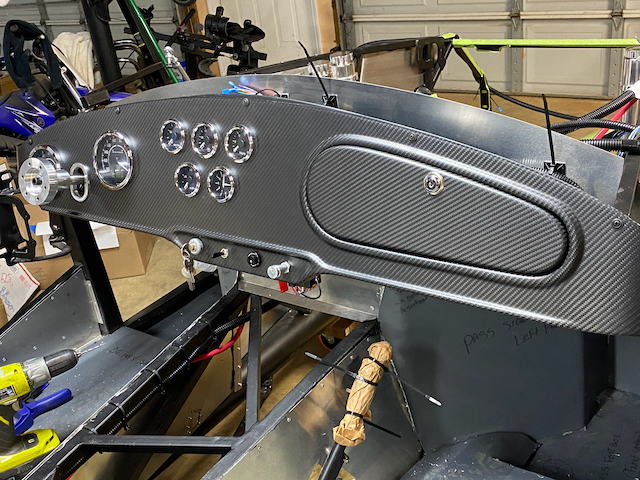
I did a temperary install of the glove box on the dash. put the box up against the square tube, then leveled and centered the dash. easy peasy.. Like others above I slid the steering shaft in while mounting the dash then just marked where the shaft hit the back of the dash. I let the two ends hang just inside the hinge mounts as others noted. Not screwed on. I tossed the FFR aluminum brackets. I welded on a mount to the 2" square frame to attach a "OH S#*T" handle just below the glove box. I made my own support for the drivers side that screws onto the 2" frame and the bottom lip of the dash. I cut out life sized paper instrument faces and used double sided tape to adjust where I wanted my gauges.
Happy Trails
DSC02858.JPGDSC02971.JPGDSC03104.JPGDSC03108.JPGDSC03297.JPGDSC03618.JPGDSC03728.JPGDSC03783.JPG


 Thanks:
  Likes:


 Reply With Quote