-
Roadster Go-kart Walk-around Video
Before I put the rest of the aluminum panels on my Factory Five MK4 Roadster, I thought I'd do a video walk-around to get a better view of things before it's all covered.
A big thank you to everyone here for all your posts and advice. It's been invaluable. What a great community!
Here's the video if anyone is interested - https://youtu.be/yyX_zarRwJE. Feedback always welcome and appreciated.
Last edited by Boula; 04-01-2023 at 09:41 PM.
-
Post Thanks / Like - 1 Thanks, 2 Likes
 GT53
GT53 thanked for this post
-
Nice build and some really nice upgrades you have selected. One thing I noticed was your Canton overflow, it looks like it is going to be very close if it clears the body. I am running the same overflow, you can see where mine is mounted for reference.


Last edited by Fman; 04-02-2023 at 07:56 AM.
-
Lots of good work there and a nice build. The more common use of the walkaround videos is a good trend. Several things I noticed:
The GPS receiver works fine on the windshield mount. Never seen one at the front like that.
Recommended to have two return springs on the throttle hook-up.
Overflow tank height may be an issue. But more importantly directly in the path of the gas shocks and maybe even the hinges for the hood.
Reservoirs on the other side might be close to the gas shocks as well. General recommendation is to leave 12" from the front of the foot box at the 3/4 top square tube. Something to check.
Temporary location for the inertia switch? Needs to be somewhere that’s reasonably accessible.
Build 1: Mk3 Roadster #5125. Sold 11/08/2014.
Build 2: Mk4 Roadster #7750. Sold 04/10/2017.
Build 3: Mk4 Roadster 20th Anniversary #8674. Sold 09/07/2020.
Build Thread and
Video.
Build 4: Gen 3 Type 65 Coupe #59. Gen 3 Coyote. Legal 03/04/2020.
Build Thread.
Build 5: 35 Hot Rod Truck #138.
Build Thread. Sold 11/9/2023.
Build 6: Mk5 Roadster 30th Anniversary #11,258.
Build Thread.
-
Post Thanks / Like - 0 Thanks, 1 Likes
-
Not a waxer

Looks very nice! As has been mentioned, the tank isn’t going to work in that location with FFR hood hinges.
Jeff
-
Thanks Fman. The pictures really help. I was worried about that when I made the mount. I actually made it so I could lower it a few inches if needed. Looks like I should go ahead and do that. Appreciate the advice! Beautiful engine bay BTW.
-
Post Thanks / Like - 0 Thanks, 1 Likes
 Fman
Fman liked this post
-
Thanks edwardb. Glad I posted the video. Great feedback. Exactly what I was hoping for. I'll look into all of those. Good to know the GPS receiver works fine on the windshield mount. I was concerned there might be too much interference in that area.
And good catch on the inertia switch. That is temporary. I had it where the manual recommends but that was in the way of the underdash filler so I pulled it and haven't remounted that yet. On the ever growing list...
-
Thanks Jeff. BTW - Reviewing your posts from over the years has been super helpful during my build. Thanks for all you and the other active contributors do to support the community.
-
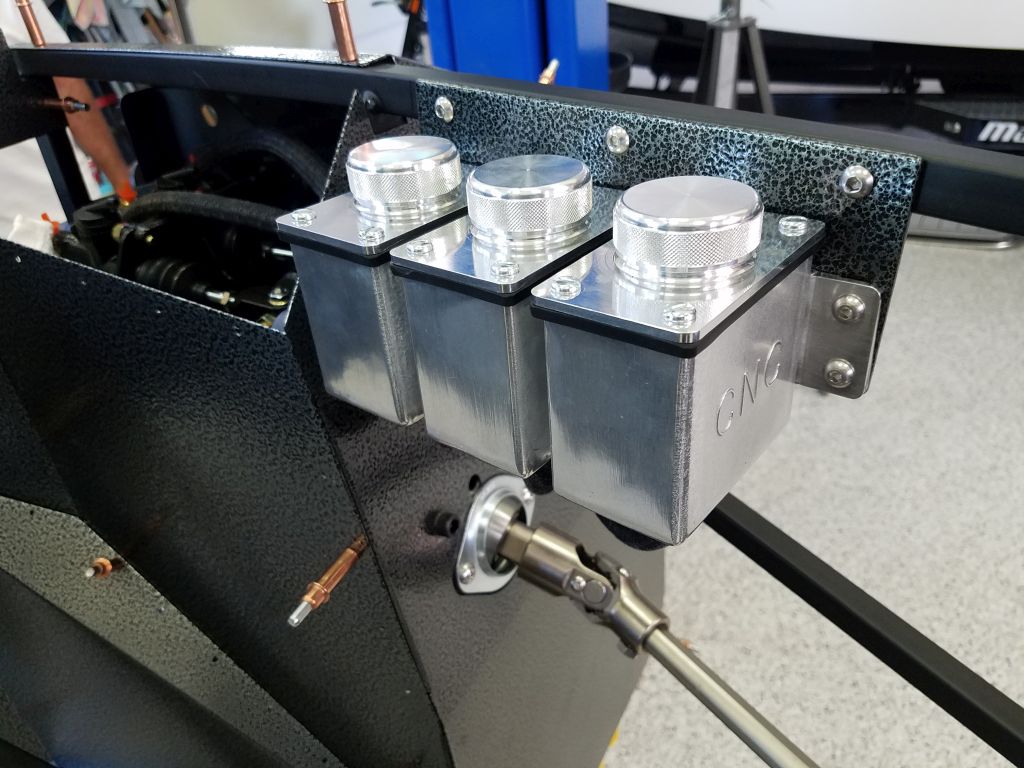
Fman - Did you mount the overflow tank directly to the f-panel? And for the MC reservoirs, do you have a bracket mounted on the outside of the 3/4" square frame tube or how are your reservoirs mounted? It's clear the body won't clear the brackets I built. Easy to fix now...hard later. Thanks again!
-

Originally Posted by
Boula

Fman - Did you mount the overflow tank directly to the f-panel? And for the MC reservoirs, do you have a bracket mounted on the outside of the 3/4" square frame tube or how are your reservoirs mounted? It's clear the body won't clear the brackets I built. Easy to fix now...hard later. Thanks again!
Yes, Canton is mounted directly to the F panel with some spacers/washers, along with stainless bolts and nylock nuts. Has been holding fine now for two years, 4900 miles. The MC reservoirs are mounted to a small aluminum plate that is bolted to the side of the frame rail.
-
Thanks Fman! Very helpful.


 Thanks:
  Likes:


 Reply With Quote