Midwest Classic Insurance

Visit our community sponsor

Thanks Thanks:  0
Likes Likes:  0
Results 1 to 17 of 17

Thread: Engine removal from the 818

  1. #1
    Senior Member
    Join Date
    Jan 2014
    Location
    Tampa, Florida
    Posts
    106
    Post Thanks / Like

    Engine removal from the 818

    20160331_095540.jpg

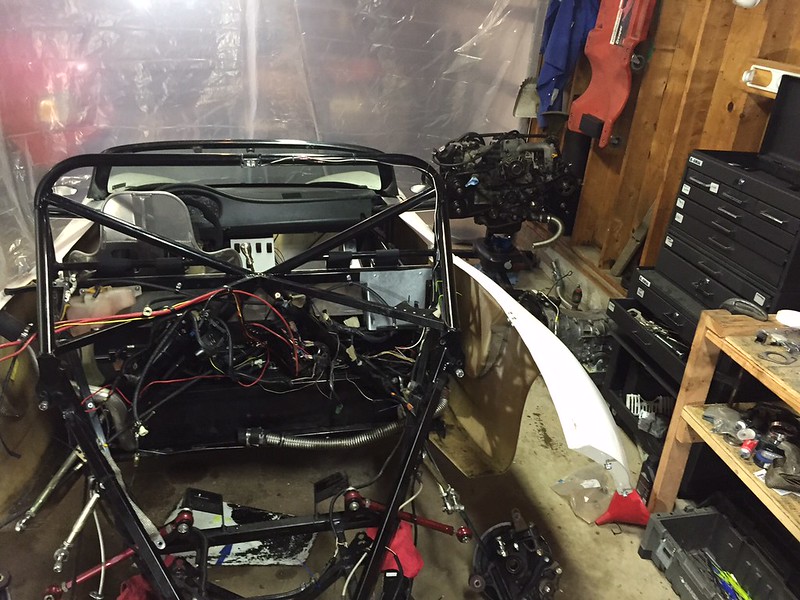
    Has anybody documented the removal of the engine from the 818? Removing it from the donor was straightforward and installation to the Factory Five frame was easy, but now that the bodywork is on I'm trying to find a way to take my blown engine out without having to take body panels off. I thought the wiring harness was the worst part of the build until I met the bodywork; then I learned what Hell was. Ok, maybe I'm being a little dramatic. The panels aren't perfect but they're as close to it as they'll get with me. I don't want to mess with them if I don't have to. I have a feeling there's no way to get around it but if there's a slim chance that someone else has found a way I figured I would ask.

    Thanks!

    Ben
    Kit #295 Picked up 11/26/2014!

  2. #2
    Moonlight Performance
    Hindsight's Avatar
    Join Date
    May 2014
    Location
    Atlanta
    Posts
    3,402
    Post Thanks / Like
    Should be able to remove it by taking off the engine cover, trunk, and rear bumper only. Side sails should be able to stay on. Bumper removing should be easy.... not much alignment to deal with in terms of the bumper....

  3. #3
    Senior Member
    Join Date
    Jan 2014
    Location
    Leesburg, VA
    Posts
    1,624
    Post Thanks / Like
    ^ +1 for removing the bumper, that will make life much easier.

  4. #4
    Senior Member
    Join Date
    Mar 2016
    Posts
    344
    Post Thanks / Like
    There are pictures and posts of where the rear fiberglass bumper is removed and they left the side sails. Then they removed the engine. This looks to be the most reasonable way to do it.

    I would also believe that there are posts that warn you to use a balance with the engine lift. I would also keep a list of each connection/step of every thing that was disconnected and will need to be reattached.

    Use this as an opportunity to document this process.

  5. #5
    Senior Member
    Join Date
    Jan 2014
    Location
    Tampa, Florida
    Posts
    106
    Post Thanks / Like
    I know, you're right. I was just hoping to be able to leave the bumper on because I Plasti Dipped right over the seams between the side sails and bumper and I know that separating them is going to cause problems with the finish. Oh well, I should stop trying to weasel out of what I know needs to be done and just go do it!
    Kit #295 Picked up 11/26/2014!

  6. #6
    Moonlight Performance
    Hindsight's Avatar
    Join Date
    May 2014
    Location
    Atlanta
    Posts
    3,402
    Post Thanks / Like
    Yes, you are likely to accidentally damage the bumper if you don't remove it. Try slicing the dip with a razor.

  7. #7
    Senior Member
    Join Date
    Jan 2014
    Location
    USA
    Posts
    587
    Post Thanks / Like
    I think you could avoid taking off the bumper if you separate the transmission and pull it separately.

  8. #8
    Senior Member
    Join Date
    Jan 2014
    Location
    Tampa, Florida
    Posts
    106
    Post Thanks / Like
    Quote Originally Posted by Aero STI View Post
    I think you could avoid taking off the bumper if you separate the transmission and pull it separately.
    That'd be really nice, then i wouldn't have to mess with draining the transaxle and pulling the half shafts. I don't know if there's enough room to slide the input shaft out of the back of the engine though. I'll keep you guys posted.
    Kit #295 Picked up 11/26/2014!

  9. #9
    Senior Member
    Join Date
    Feb 2014
    Location
    Asheville, NC
    Posts
    1,230
    Post Thanks / Like
    I removed bumper and deck lids, and suspension pieces. I couldn't get the axles out if I didn't serverely loosen/remove a few rear suspension pieces. Wasn't an issue to pull at all.

    Frank - Build thread

  10. #10
    Senior Member
    Join Date
    Jan 2014
    Location
    Leesburg, VA
    Posts
    1,624
    Post Thanks / Like
    In my experience, it was difficult to install/remove the engine and trans as two separated pieces. I'd highly recommend removing them as a unit. Without the trans attached, the engine will want to lean forward on it's mounts, not to mention you'd have to clear the top cross braces, which will be tricky with the trans in place.

  11. #11
    Senior Member
    Join Date
    Sep 2012
    Location
    Cincinnati OH
    Posts
    3,919
    Post Thanks / Like
    I haven't had my engine out yet.
    But I've gone through 2 sets of axles and a mt5.
    disconnect battery
    Remove both engine covers (coupe roof if 818C)
    Remove diffuser and engine belly pan
    unplug tail lights and remove rear bumper
    disconnect most of the suspension at the rear knuckles.
    remove half shafts (leak gear oil all over floor)
    remove exhaust manifold and up-pipe
    remove exhaust
    remove shock tower brace
    remove shifter cables
    disconnect all hoses and wires from engine and transmission.
    remove engine and transmission either one at a time or as an assembly.

    I had no issue mounting trans to engine in the car.
    rear.jpg
    Bob
    Last edited by Bob_n_Cincy; 03-31-2016 at 09:22 PM.
    818S #22 Candy Blue Frame, Front Gas Tank, 2.5L Turbo, Rear radiator, Shortened Transmission, Wookiee Compatible, Console mounted MR2 Shifter, Custom ECU panel, AWIC soon
    My Son Michael's Turbo ICE Build X22 http://thefactoryfiveforum.com/showt...rts-818S-Build
    My Electric Supercar Build X21 (on hold until winter) http://thefactoryfiveforum.com/showt...e-Build-Thread

  12. #12
    Senior Member
    Join Date
    Nov 2015
    Location
    Lakeland, FL
    Posts
    185
    Post Thanks / Like
    Quote Originally Posted by Hindsight View Post
    Try slicing the dip with a razor.
    This ^^^
    818C | Kit delivery: 3/19/16 | Status: Powertrain installed
    Daily: 2014 CTS-V - Fat and slow

  13. #13
    Senior Member
    Join Date
    Apr 2014
    Posts
    104
    Post Thanks / Like
    hot razor or exacto knife and then go back over it with napatha to lay the edges down on the dip after you make the cut. put on a rubber glove dip it in your thinner (nap) and work from inside out towards the edge to re liquefy it a little and get it to wrap onto the sail and bumper respectively.

  14. #14
    Senior Member
    Join Date
    Jan 2014
    Location
    Tampa, Florida
    Posts
    106
    Post Thanks / Like
    20160401_121120.jpg
    Razor blade worked great, thanks guys.
    Kit #295 Picked up 11/26/2014!

  15. #15
    Moonlight Performance
    Hindsight's Avatar
    Join Date
    May 2014
    Location
    Atlanta
    Posts
    3,402
    Post Thanks / Like
    Good deal! That dip looks good, by the way!

  16. #16
    Senior Member
    Join Date
    Jun 2013
    Location
    NoVA
    Posts
    1,068
    Post Thanks / Like
    ^^^Agreed. I'd like to see some more pictures.

  17. #17
    Senior Member
    Join Date
    Jan 2014
    Location
    Tampa, Florida
    Posts
    106
    Post Thanks / Like
    Quote Originally Posted by Hindsight View Post
    Good deal! That dip looks good, by the way!
    I appreciate it. The dip job is far from perfect but for my first one I'm more than happy. The great thing is that now that I have the equipment I can completely change it for about $150 in materials. Unfortunately I don't have a lot of pictures. In fact, I just got around to taking these about half an hour before I blew my engine.

    2016-02-28 19.51.37.jpg
    2016-02-28 19.53.49.jpg
    20160228_085251_Richtone(HDR).jpg
    20160228_084657_Richtone(HDR).jpg
    20160228_084516_Richtone(HDR).jpg
    Kit #295 Picked up 11/26/2014!

Tags for this Thread

Posting Permissions

  • You may not post new threads
  • You may not post replies
  • You may not post attachments
  • You may not edit your posts
  •  

FFMetal

Visit our community sponsor