


oldguy668
Coyote Engine Info posts

by , 02-27-2011 at 09:41 AM (10614 Views)
I'm going to post part numbers as I find them. I'll also post photos of the pan and exhaust headers as they develop.
Heater hoses.
These hoses have the correct ends to mount directly on the Coyote stubs, and are shaped to fit under the engine cover.
Right side hose.......BR3Z-18472-B
Right side bracket...BR3Z-8A082-A
Left side Hose.........BR3Z-18472-D
Left side bracket.....BR3Z=8A082-B
If you don't use a heater, you should still use these hoses so you can cross connect them at the rear and install a tee for your temp gauge sender. The water flow will help keep the head temp consistent when the thermostat is closed. The brackets are optional but provide a neat way to manage the hoses.
Upper Radiator Hose
Unless Ford releases the end connector separately (or FRPP ships it with the motor), you'll need the upper hose just to have the end that connects to the plastic connector on the thermostat bypass housing.
Part number.....BR3Z-8260-B
The lower hose connects to a standard type outlet on the motor.
Oil filter
The standard Motorcraft filter hits the frame tube. Replace it with a Fram PH10060, which is identical except it's .9" shorter.
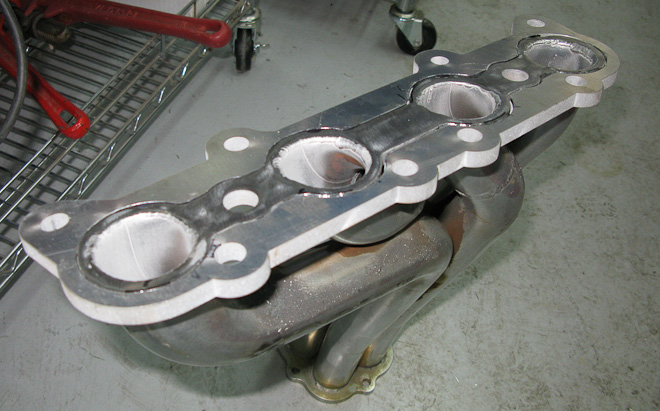
Header Adapters
Well, thanks to Astglenn and his giant water pistol, these puppies arrived today on the Big Brown Truck.
They drop right on to the studs on the Coyote block.
Glenn and Dave Borden worked out the details so the finished product looks like this
I was a little concerned with alignment, so I asked Glenn to go one step further and make this template for me
Now, all I have to do is scribe the perimeter of the template and cut the excess from the stock flange
So thanks to David and Glenn for working out the initial concept and extra thanks to Glenn for giving in to my whining and making the cutting template.
So now for the bad news! Glenn's plates mate right up, and the nuts have plenty of clearance for various combinations of box wrenches and u-joint sockets, but the back 3 nuts on the driver's side are freaking impossible to get at. I was able to reach them through a hole in the side of the footbox that I cut to gain clearance for the gas pedal foot. Get yourself a 15mm deep socket and an assortment of extensions and u-joints. A 12 pt. 15mm box wrench will come in handy.
Hole in my Block!
The modular family of engines have a torque converter bolt access hole in the back of the block opposite the starter. The 5.0 crate engines do not come with the plug you'll need (at least mine didn't). The correct part number for the plastic plug is F65Z-6C070-AB. About six bucks.
Using that expensive upper hose
I hate waste, and having to buy a pricey hose just to get one connector isn't how I roll. The upper hose almost works, but a few tweaks made it perfect. Plus, my car is an all black motif so the black nylon covering on the hose fits right in. Here's the finished product:
I took 5.5" out of the section upstream of the first 90 degree bend in the hose (save the piece you cut out). I bought a 1.5" 45 degree mandrel bend from Race Parts Solutions and cut about 2.5" from each end of that (save the pieces again). I then used the hose cutoff (about 2.5" of it) to connect the 45 to the radiator inlet and then used one of the cutoffs from the 45 to reconnect the hose where it was cut. The fancy clamps are a little too "in my face", so I might replace the pair at the splice with Gates Powergrip heatshrink clamps.
Lower Radiator Hose.
Yes, folks, the 1023 hose really works...you just have to do a little "convincing". Here's the unmolested 1023 hose (that I bought 6 years ago for my MK 2 but couldn't make it work).
The orange lines are where I want to cut it. The dimensions are approximate and not critical.
Here's the orientation before it was cut, but the hashmarks were applied during the mockup stage
Here's the same area but after I twisted the hose about 10 degrees (with a 1.5" aluminum sleeve inside)
The other cut is very similar. No reversing the pieces or swapping the ends. Just a few degrees of twist is all it takes. Here's the "before" orientation
Here's the finished product ready for clamps.
The hose fits the Coyote inlet fitting perfectly, and snakes down through the space between the rack and the X-member. Right where it passes through, I intend to add a rubber sleeve because it might sag and touch when there's water in it. Other than that, there's no need to tie it down (or up). It clears the steering shaft, the frame tow hook and everything in between.


Tags:
None

- Categories
- Uncategorized
 Email Blog Entry

